Posted by Daniel on September 17th, 2009 | No Comments »
Spent today fixing a number of memory leaks in the client.
Ran the Visual Leak Detector, and these were the results:
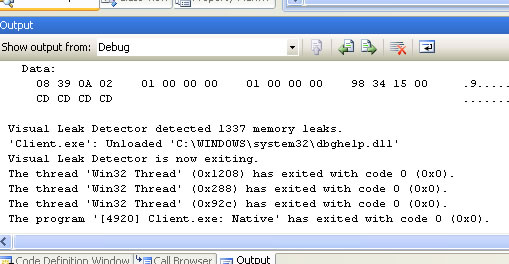
There aren’t literally that many memory leaks, it’s misleading – simply failing to call delete can cause dozens of reported leaks.
Posted by Daniel on September 3rd, 2009 | 1 Comment »
Posted by Daniel on August 29th, 2009 | 39 Comments »
Changelog:
13 July 2010:
– Recommend CMake version 2.8.0
6th January 2010
– Building the latest 1.7 dependencies package.
– It’s now a generic Building Ogre with Visual Studio guide, since there’s no longer a compelling reason to build from trunk.
This is my “hold-your-hand” guide to building the latest Ogre with Visual Studio C++, trunk or stable.
13 July 2010: If anyone could test this guide for Visual Studio 2010 and let me know if it works or not, I would appreciate it. I don’t have access to a Windows machine right now.
Prerequisites
Building Ogre
- You need to build the dependencies. Extract the Dependencies folder from the zip into the root directory (/trunk/Dependencies/). Go to Dependencies/src and open OgreDependencies.VS20xx.sln. Right click the solution and click Build Solution, which will build every project. Do this for both Release and Debug.
- Open CMake. “Where is the source code” should point to the root directory, and “Where to build the binaries” should point to a sub folder in the root directory. For example, you can create a folder named VCBuild.
- Click Configure. Choose the compiler you are building for.
- A list of options in red will appear. Configure it how you choose. I disable BUILD_PLUGIN_BSP and BUILD_RENDERSYSTEM_D3D10 since they are unnecessary for me.
- [OPTIONAL] If you have boost built and require threading, set the BOOST_ROOT value to the root of your boost directory (e.g. “C:/boost_1_39”). Subsequent boost variables should automatically be populated. (If this is an environment variable, it should automatically detect it.) Don’t forget to set CONFIG_THREADS to 1 or 2 depending on your requirements.
- Click configure once again.
- The options should turn grey. Click OK.
- Open OGRE.sln in your build directory.
- Right click the ALL_BUILD project and click Build. Do this for both Release and Debug.
- Right click the INSTALL project and click Build. Do this for both Release and Debug.
- You’re done! Make sure you direct any projects using Ogre to the generated sdk folder in your build directory.
FAQ
What happened to CEGUI?
From 1.7, CEGUI is no longer part of Ogre. You should now treat it as a separate library. For instructions, refer to Building CEGUI.
What do I do next?
If you’ve not familiar with setting up an Ogre application, see my Ogre and Visual Studio Beginners FAQ and follow the walkthrough.
Let me know if you have problems with any of the steps, suggestions etc.
Posted by Daniel on July 31st, 2009 | No Comments »
Yesterday I attended an event in York showcasing the Phoenix Centre, which is an initiative aimed at helping creative and technological startup businesses in the area. The event started with a presentation from some of the businesses based in the centre followed by a tour and networking.

I met some interesting people, and also had a chance to show off our plans and developments, which provoked some interest. The centre offers heavily subsidised office space for a year, with many benefits geared towards helping businesses on our wavelength succeed. Perhaps this could lead to something, who knows.
Posted by Daniel on July 9th, 2009 | 1 Comment »
In this so-called new age of web design, there appears to be an underlying trend in “Web 2.0” websites. Something about it makes me cringe, because wherever you look, especially in websites showcasing portfolios or whatever, the language style is exactly the same. Informal speak, as if you’re talking to the visitor as a friend, I guess. To me, it’s pure cheese.
HELLO. MY NAME IS BOB SMITH. I MAKE GOOD WEBSITES, AND STUFF.
You know what I’m talking about. The HUGE TEXT THEY USE TO SHOUT AT THE USER ON THE HOMEPAGE. Okay, so why? Well, you could argue it draws in the user’s attention, and that it instantly tells the user what the website is about. Fair enough. But I get bored when browsing CSS design showcases, only to find almost all of them follow this trend. Admittedly, even I fall victim to this nonsense. I get a feeling design showcases discriminate websites that don’t. Perhaps it’s just another internet phase.
My 5 minute browsing results:
http://paiko.de/
http://www.baeck.no/
http://www.sergionoviello.com/
http://nathan-sanders.com/
http://www.shannonmoeller.com/
http://www.jamisonbanham.com/
http://www.jasonreedwebdesign.com/
http://sprawsm.com/
http://www.postmachina.com/
I could go on… Forever.
Posted by Daniel on June 28th, 2009 | 24 Comments »
Changelog:
6th January 2010
– Updated application walkthrough for Ogre 1.7.
Overview
Howdy! This is my little FAQ and troubleshooting guide for anyone new to the Ogre engine. I will be expanding it over time to cover as many problems and questions as possible. The following assumes that you are using Visual Studio C++ 2005/2008 and have built the latest Ogre.
If you haven’t yet built Ogre, see my Building Ogre with Visual Studio guide.
Can you walk me through setting up an Ogre application?
Sure!
- Open up Visual Studio C++.
- File -> New -> Project…
- Make sure the project type is “Win32” and the templated “Win32 Console Application” is highlighted.
- Enter the name and location of your project in the respective fields. I named mine “OgreTestProject”.
- An application wizard will pop up. Click “Application Settings” and check “Empty project” then click finish.
- Right click the “Source Files” folder in the Solution Explorer. Then Add -> New Item…
- Select “C++ File (.cpp)” and enter “main” in the Name field. Add “\src” to the end of the Location field value.
- Go to Project -> Properties.
- In the top left hand corner of the Properties window change the Configuration to “All Configurations”.
- Select General in the Configuration Properties. Copy the “Output Directory”. Select Debugging and paste this in the “Working Directory” field.
- Expand C/C++ -> General
- In the “Additional Include Directories” click the “…” button and a dialog should pop up. Again, click the “…” button, navigate to YourOgreRoot/YourBuildDir/sdk/include and select the subfolder “OGRE”. Click ok twice.
- Change the Configuration drop-down in the top left to “Debug”
- Expand Linker -> General
- In the “Additional Library Directories” navigate to YourOgreRoot/YourBuildDir/sdk/lib and select the subfolder “Debug”.
- Go to Linker -> Input
- In “Additional Dependencies” add “OgreMain_d.lib”.
- Change the Configuration drop-down in the top left to “Release”
- Go to Linker -> General
- In the “Additional Library Directories” navigate to YourOgreRoot/YourBuildDir/sdk/lib and select the subfolder “Release”.
- Go to Linker -> Input
- In “Additional Dependencies” add “OgreMain.lib”.
- Click ok.
- Enter the following code in main.cpp:
#include <Ogre.h>
int main(int argc, char* argv[])
{
Ogre::Root* root = new Ogre::Root("plugins.cfg", "ogre.cfg", "Ogre.log");
delete root;
return 0;
}
- In the toolbar at the top next to the green arrow is a drop-down list. Make sure this is set to “Debug”.
- Click the green arrow.
- Oh no! You got “This application failed to start because OgreMain_d.dll was not found. Re-installing the application may fix this problem”.
- Navigate to the location of your Ogre SDK and head to the bin folder, then the debug folder. Copy “OgreMain_d.dll”.
- Go to your project directory, there should be a new folder named “Debug” paste “OgreMain_d.dll” in there.
- Press the green arrow in Visual Studio again.
- Congratulations! You just ran your first Ogre application!
Why did my application crash?
So you’ve managed to get your application to compile, but something is wrong, it crashes when you run it! Here’s a step-by-step process to help you through it:
- Make sure your Working Directory (Project -> Properties -> Debugging -> Working Directory) is the same as your Output Directory (Properties -> General). This is a common cause of confusion, because without it set, Visual Studio cannot see any local files. This means it cannot find plugins.cfg or resources.cfg, so you might get resource or DLL not found errors.
- Make sure the compiler is set to “Debug” (the drop-down next to the green compile button in the top bar)
- The compiler will generate Debug and Release directories according to where and how your Output Directory (Project -> Properties -> General) is set (for example “.\bin\$(ConfigurationName)”). In your Debug folder you should have debug DLLs, and in the release folder you should have release DLLs. Debug DLLs commonly have the suffix _d at the end of the filename. Likewise, check that in your Debug configuration you are linking to Debug libraries with a _d suffix (Properties -> Linker -> Input -> Additional Dependencies).
- Run the application through Visual Studio (by clicking the green “Start Debugging” icon in the toolbar). Don’t run it by clicking on the exe.
- If something is wrong with your code, usually Visual Studio will point to the line that caused the crash. If this is the case, a yellow arrow pointing directly at the line means that it is that very line which caused the crash. If it is a green arrow, that means Visual Studio could only trace the crash up to that point, and the root of the crash is deeper.
- Check your stack trace. This is in a box on the bottom right named “Call Stack”. This shows the last lines the application stepped through before a crash. (Sometimes people will ask for this if you need help with a crash)
- Check the Ogre.log file for any abnormal messages like errors. This is generated in your application directory by default. Lines starting with OGRE_EXCEPTION are ones to look out for especially.
- Do you have all the required DLLs? Ogre on it’s own requires OgreMain(_d).dll, but there may be other libraries that you are linking to which the application requires. For example, if you’re using any CG shaders, make sure you have cg.dll, AND load the Plugin_CgProgramManager(_d).dll. You may use CEGUI, which requires the following: CEGUIBase(_d).dll, CEGUIExpatParser(_d).dll, CEGUIFalagardWRBase(_d).dll and OgreGUIRenderer(_d).dll. If you’re using OIS for input, you’ll need OIS(_d).dll.
- Search the Ogre forums, or Google, to see if anyone has had a similar problem.
- Post your problem in the Ogre forums. We’re happy to help. :)
Other things to check:
- Are the contents of your plugins.cfg and resources.cfg correct? Make sure the paths are correct.
- Do you have any referenced but undeclared pointers? The compiler is blind to this problem. If you have not initialised the pointer, and try to reference it, the application will crash at runtime. See here.
I get errors when compiling!
error: SomeHeader.h: No such file or directory
The compiler cannot find the header file(s) you specified. If these are library headers that it cannot find, you need to tell Visual Studio where to find them. Go to: Project -> Properties -> C/C++ -> General -> Additional Include Directories and add the include directories where the headers can be found. (In Ogre’s case that would be C:\OgreSDK\include)
fatal error LNK1104: cannot open file “SomeLibrary.lib”
Similarly, Visual Studio cannot find the file you’re trying to link against. Go to: Project -> Properties -> Linker -> General -> Additional Library Directories and add the directory where the library can be found.
error LNK2001: unresolved external symbol
These are a pain for beginners, and they look daunting. What it means is that the compiler cannot find the implementation of a function (.cpp) that was specified in a header file (.h). Your application may build fine, but when the compiler starts to pull all of the application together (linking), it spits out those errors. Almost ALWAYS, this is to do with not linking a certain library. According to what the unresolved external errors are suggesting, is the library that you need to link to. e.g. if it’s a load of Ogre functions, that means you haven’t linked to OgreMain.lib. Go to Project -> Properties -> Linker -> Input -> Additional Dependencies and add it.


